Page 2: Steps 3-5, Conclusion
Step 3: Test LDAP server
The command "ldapsearch -x -b dc=asetest" will basically dump records in the base DN of dc=asetest without using authentication. You should see basic things such as the admin entry. The LDAP directory is good to go.
Step 4: Look at the config file
The file /etc/ldap/slapd.conf has the configuration for the slapd package. In it you will find answers that you gave during the configuration step. The lines that are important are...
This group says that only the admin and self can change the userPassword field. That makes perfect sense since you don't want some random person changing someone else's password. Permissions in slapd are easy to configure by looking at other examples in the config file.
If you changed the config file, you must restart slapd. "sudo /etc/init.d/slapd restart" will restart the process. This step is actually the final step needed to get a working LDAP server. The next step is optional and extremely useful.
Step 5: Install phpLDAPadmin
We need an easy way to administrate the LDAP server. While the command line tools work fine, it would be nice to use a web interface. Thankfully, phpLDAPadmin comes in to the picture. Type...
aronschatz@aseserver:~$ sudo apt-get install phpldapadmin
Which will install phpLDAPadmin. This install will grab information from the slapd configuration and setup to work with the LDAP server. You can now navigate to that server's name or IP address and append /phpldapadmin/ and get to the phpLDAPadmin page in a browser.
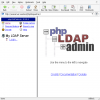
This is the initial welcome screen of phpLDAPadmin. This is nice, but you will want to Login to the server to do anything useful.
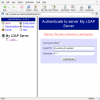
The Login DN is a distinguished name. This is a full typed LDAP entry. Mine would be "cn=admin,dc=asetest". Let's say your server directory wa ldap.aseserver.asetest and the name was admin. The Login DN would be "cn=admin,dc=ldap,dc=aseserver,dc=asetest". The password is your admin password.
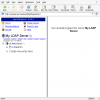
Once you are authenticated, you can administer the LDAP server. It is very easy to make groups and new users, but a follow-up guide will go into making LDAP work for centralized logins and such.
Conclusion:
Setting up OpenLDAP on Ubuntu is simple and effective. Within minutes, you have a fully functional LDAP server waiting to be used. The is the first step in making a centralized logon facility and directory services for everyone on your network. Stay tuned for another guide how to make a schema that works for different uses. For further reading, buy some LDAP books. I'm sure it is a good bathroom read.
If you have any questions, feel free to »post in the forums or email me.
Code
aronschatz@aseserver:~$ ldapsearch -x -b dc=asetest
# extended LDIF
#
# LDAPv3
# base <dc=asetest> with scope subtree
# filter: (objectclass=*)
# requesting: ALL
#
# asetest
dn: dc=asetest
objectClass: top
objectClass: dcObject
objectClass: organization
o: ASE LDAP
dc: asetest
# admin, asetest
dn: cn=admin,dc=asetest
objectClass: simpleSecurityObject
objectClass: organizationalRole
cn: admin
description: LDAP administrator
# search result
search: 2
result: 0 Success
# numResponses: 3
# numEntries: 2
The command "ldapsearch -x -b dc=asetest" will basically dump records in the base DN of dc=asetest without using authentication. You should see basic things such as the admin entry. The LDAP directory is good to go.
Step 4: Look at the config file
The file /etc/ldap/slapd.conf has the configuration for the slapd package. In it you will find answers that you gave during the configuration step. The lines that are important are...
Code
access to attrs=userPassword,shadowLastChange
by dn="cn=admin,dc=asetest" write
by anonymous auth
by self write
by * none
by dn="cn=admin,dc=asetest" write
by anonymous auth
by self write
by * none
This group says that only the admin and self can change the userPassword field. That makes perfect sense since you don't want some random person changing someone else's password. Permissions in slapd are easy to configure by looking at other examples in the config file.
If you changed the config file, you must restart slapd. "sudo /etc/init.d/slapd restart" will restart the process. This step is actually the final step needed to get a working LDAP server. The next step is optional and extremely useful.
Step 5: Install phpLDAPadmin
We need an easy way to administrate the LDAP server. While the command line tools work fine, it would be nice to use a web interface. Thankfully, phpLDAPadmin comes in to the picture. Type...
aronschatz@aseserver:~$ sudo apt-get install phpldapadmin
Which will install phpLDAPadmin. This install will grab information from the slapd configuration and setup to work with the LDAP server. You can now navigate to that server's name or IP address and append /phpldapadmin/ and get to the phpLDAPadmin page in a browser.
This is the initial welcome screen of phpLDAPadmin. This is nice, but you will want to Login to the server to do anything useful.
The Login DN is a distinguished name. This is a full typed LDAP entry. Mine would be "cn=admin,dc=asetest". Let's say your server directory wa ldap.aseserver.asetest and the name was admin. The Login DN would be "cn=admin,dc=ldap,dc=aseserver,dc=asetest". The password is your admin password.
Once you are authenticated, you can administer the LDAP server. It is very easy to make groups and new users, but a follow-up guide will go into making LDAP work for centralized logins and such.
Conclusion:
Setting up OpenLDAP on Ubuntu is simple and effective. Within minutes, you have a fully functional LDAP server waiting to be used. The is the first step in making a centralized logon facility and directory services for everyone on your network. Stay tuned for another guide how to make a schema that works for different uses. For further reading, buy some LDAP books. I'm sure it is a good bathroom read.
If you have any questions, feel free to »post in the forums or email me.


